Creating one good AI-generated portrait is easy.
Creating the same character again and again? That is where things get tricky.
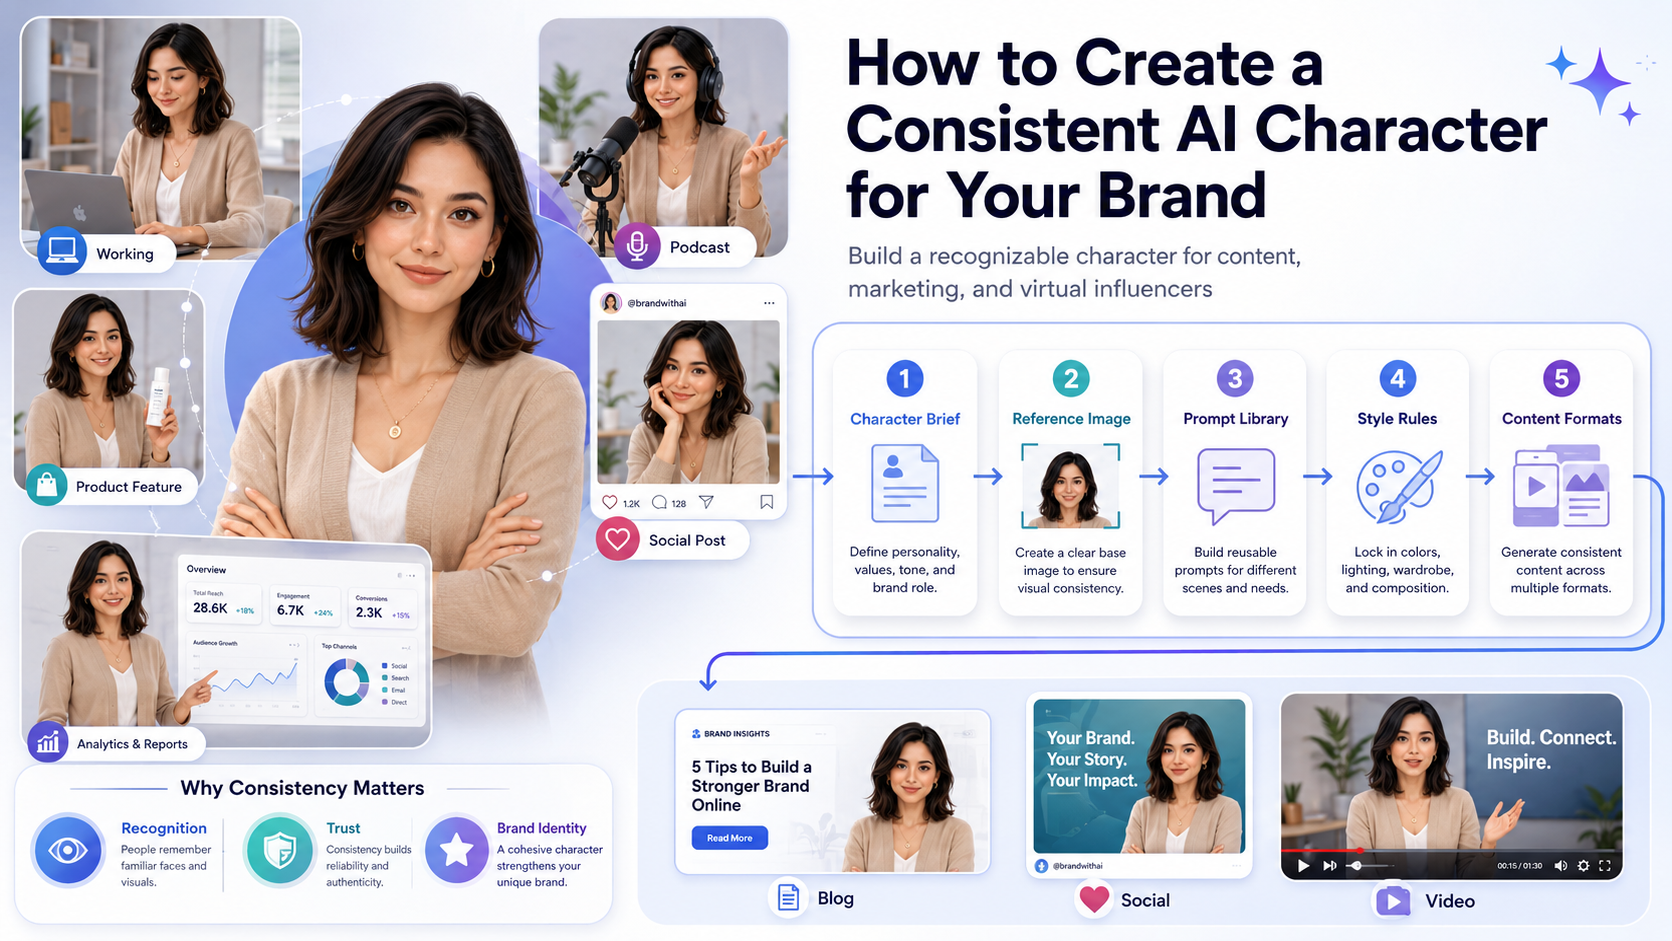
If you are building a brand mascot, virtual influencer, fictional founder, AI spokesperson, or recurring campaign character, consistency matters. You need the same face, the same visual personality, and the same creative direction across multiple images.
Otherwise, your “brand character” starts looking like a shapeshifter with commitment issues.
A consistent AI character can help your audience recognize your content faster, especially if you use it across blog images, social media posts, ads, landing pages, videos, or digital products.
This guide walks you through how to create a consistent AI character for brand content without turning your workflow into a prompt engineering swamp.
What Is a Consistent AI Character?
A consistent AI character is a generated person, mascot, or fictional identity that can appear in different scenes while still looking recognizable.
The character might change poses, outfits, locations, or facial expressions, but the core identity should stay the same.
That includes things like:
- Face shape
- Hair style
- Skin tone
- Clothing style
- Body type
- Personality
- Mood
- Brand colors
- Photography or illustration style
For example, the same AI character might appear working at a laptop, recording a podcast, holding a product, walking through a city, explaining a SaaS dashboard, or appearing in a short-form video.
The goal is not just to create one nice image. The goal is to create a repeatable identity your audience can recognize.
That is the difference between a random AI portrait and a brand asset.
Why Consistent AI Characters Matter for Branding
Consistency builds recognition.
If every image looks like a different person, your audience cannot connect the visuals. That weakens your brand identity.
A consistent AI character can be useful for:
- Virtual influencer content
- Brand storytelling
- Social media campaigns
- Course or product mascots
- YouTube thumbnail identity
- Email newsletter visuals
- Explainer content
- Fictional case studies
- Ad creative testing
For solopreneurs and small teams, this can be especially useful. You can create a recognizable visual identity without hiring models, booking photoshoots, or managing a full creative department.
That does not mean AI replaces brand strategy. It does not. But it can help you produce visual content faster once you know exactly who your character is supposed to be.
Step 1: Define the Character Before Generating Images
Do not start by prompting randomly.
This is where many people go wrong. They open an AI image tool, type something like “young founder working on laptop,” and hope the character somehow becomes consistent later.
That usually does not work.
Start with a simple character brief instead.
Your character brief should include:
- Name
- Age range
- General appearance
- Personality
- Clothing style
- Brand role
- Visual mood
- Content purpose
- Do-not-use rules
Here is an example:
Character name: Maya
Role: AI workflow coach for solopreneurs
Age range: Late 20s to early 30s
Appearance: Professional, friendly, modern
Style: Minimalist smart-casual outfits, neutral colors
Personality: Calm, practical, focused
Use case: Blog images, social posts, workflow tutorials
Visual mood: Clean SaaS editorial photography
Avoid: Luxury influencer look, heavy makeup, exaggerated poses, unrealistic body proportions
This brief becomes your creative anchor.
The more clearly you define the character before generating images, the less you have to fight the tool later.
Step 2: Choose the Right AI Image Tool
Not every AI image generator is built for character consistency.
Some tools are excellent for beautiful one-off images, but they struggle to keep the same person across multiple generations. That is fine if you are making concept art or a mood board. It is less helpful if you are trying to build a recognizable brand character.
For consistent AI characters, look for tools or workflows that support:
- Character references
- Face consistency
- Custom character creation
- Image references
- Pose control
- LoRA or model training
- Seed reuse
- ControlNet-style workflows
- Character libraries
Beginner-friendly tools are usually better if you want speed and convenience. Technical workflows are better if you want deeper control.
There is no single perfect answer here. The right tool depends on whether you care more about ease of use, image quality, pose control, video support, or custom training.
If you are still comparing platforms, choose based on workflow instead of hype. A tool that creates beautiful images but cannot keep your character stable may not be the right fit for brand content.
Step 3: Create a Master Reference Image
A master reference image is the visual foundation of your character.
Think of it as the character’s passport photo, but less depressing.
This image should be:
- Clear
- Front-facing or three-quarter view
- Well-lit
- High quality
- Simple in the background
- Consistent with your brand style
Avoid starting with an image that has extreme lighting, strange angles, heavy filters, busy accessories, or dramatic shadows. Those details can confuse the AI and show up again in future images when you do not want them.
A simple portrait usually works best.
For example, if your character is a friendly business coach, start with a clean portrait in soft natural light. If your character is a futuristic product guide, you can make the styling more modern, but still keep the reference image readable.
Your master reference image should make the character easy to recognize.
Step 4: Build a Strong Character Prompt
Once you have the character brief and reference image, build a prompt that combines identity, style, and scene.
Use this structure:
Create an image of [character name], a [character description], with [key physical traits], wearing [clothing style], in [scene]. Use [visual style], [lighting], and [mood]. Keep the character consistent with the reference image. Avoid [negative details].Here is an example:
Create an image of Maya, a friendly AI workflow coach for solopreneurs, with a calm professional appearance, shoulder-length dark hair, and smart-casual neutral clothing. She is working at a minimalist desk with a laptop showing abstract automation dashboard elements. Use clean SaaS editorial photography, soft natural lighting, and a focused productive mood. Keep the character consistent with the reference image. Avoid heavy makeup, distorted hands, logos, and readable text.The scene can change, but the core identity should stay stable.
For example, you can reuse the same identity and change only the activity:
Maya recording a short tutorial video in a clean home office.Maya reviewing analytics on a laptop dashboard.Maya standing beside a whiteboard with simple workflow diagrams.This keeps the character recognizable while giving you variety for different content formats.
Step 5: Create a Prompt Library
Once you find a prompt that works, save it.
Read Again : AI Image Prompts for Solopreneurs
Do not rewrite everything from scratch every time. That is how visual consistency slowly wanders into the woods and comes back wearing a different haircut.
Instead, build a prompt library with reusable modules.
Character Identity Module
Maya, a friendly AI workflow coach for solopreneurs, calm professional appearance, shoulder-length dark hair, smart-casual neutral clothingVisual Style Module
Clean SaaS editorial photography, soft natural lighting, minimalist workspace, modern professional moodNegative Prompt Module
Avoid distorted hands, extra fingers, unreadable text, logos, harsh shadows, unrealistic skin, exaggerated poses, inconsistent ageScene Variation Module
- Planning an automated email workflow on a laptop
- Recording a short tutorial video in a home office
- Reviewing analytics on a SaaS dashboard
- Holding a tablet with abstract business charts
- Standing beside a whiteboard with workflow diagrams
This modular system makes your workflow faster and more consistent.
Instead of creating a new prompt from zero, you can mix and match the same character identity, visual style, and negative prompt with different scenes.
Step 6: Keep Clothing and Style Consistent
Clothing plays a big role in character recognition.
You do not need the exact same outfit in every image, but you should define a consistent wardrobe direction.
Examples:
- Minimalist black turtleneck and neutral blazer
- Casual startup hoodie and jeans
- Clean white shirt and beige jacket
- Futuristic but simple workwear
- Creator-style neutral wardrobe
If the character changes clothing style too much, the identity may feel unstable.
For example, if Maya is a calm AI workflow coach, she probably should not appear in one image wearing a beige blazer, in another wearing a luxury evening dress, and in the next wearing neon cyberpunk armor.
Unless your brand is chaos. In that case, carry on carefully.
A simple wardrobe rule might look like this:
Maya usually wears neutral smart-casual outfits: beige blazer, white top, black trousers, or simple minimalist workwear.That one sentence can keep your visuals much more coherent.
Step 7: Control the Setting
A consistent character also needs a consistent world.
The background, lighting, and environment all help shape how the audience remembers the character.
Your setting might be:
- Minimalist home office
- SaaS startup workspace
- Bright creator studio
- Clean digital dashboard environment
- Urban lifestyle setting
- Soft editorial background
For a solopreneur brand, a clean workspace often works better than overly futuristic scenery. It feels relatable, practical, and easier to connect with.
A strong setting direction might be:
Minimalist home office, laptop, soft natural light, clean desk, subtle SaaS dashboard elements, modern productivity atmosphere.This gives the character a recognizable environment without making every image look exactly the same.
You can change the activity, camera angle, or props, but keep the overall visual world consistent.
Step 8: Use the Character Across Different Content Types
Once your character is stable, you can use it across different formats.
That is where the character starts becoming a real brand asset.
Blog Images
Use your AI character as a visual guide or narrator in blog headers. This works well for educational content, tutorials, and thought-leadership posts.
Example prompt:
Maya, a friendly AI workflow coach for solopreneurs, working at a clean desk with a laptop and abstract workflow dashboard elements, wide 16:9 blog header image, soft natural lighting, clean SaaS editorial style, space on the right for headline text, no logos, no readable text.Social Media Posts
Use the character in square or vertical images with space for text overlays.
Example prompt:
Maya standing in a bright home office, pointing toward floating workflow icons, modern social media graphic style, clean background, square 1:1 format, space for a headline, professional and friendly mood, no text, no logos.Email Newsletters
Use the character in small illustrations, banners, or section headers.
Example prompt:
Maya reviewing a content calendar on a laptop, clean newsletter header image, soft colors, simple composition, friendly professional mood, no readable text.Landing Pages
Use the character as a friendly product guide or visual spokesperson.
Example prompt:
Maya standing beside a clean SaaS dashboard interface, premium website hero image, bright modern workspace, soft natural lighting, space on the left for headline and call-to-action, no logos, no readable text.Video Content
Use character images as starting points for AI video tools, where supported.
For video, consistency can be harder because motion adds another layer of complexity. Start with short clips, simple movements, and stable scenes before trying more complicated shots.
Digital Products
Use the character in workbooks, templates, onboarding guides, lead magnets, or course materials.
Example prompt:
Maya appearing as a friendly guide inside a digital workbook layout, clean educational style, neutral colors, modern creator brand aesthetic, no readable text, no logos.The more consistently you use the character, the more familiar it becomes.
Step 9: Document Your Character Rules
Create a simple brand character guide.
This does not need to be fancy. A one-page document is enough.
Include:
- Character name
- Character description
- Personality
- Approved outfits
- Approved scenes
- Prompt examples
- Negative prompts
- Image ratios
- Approved use cases
- Things to avoid
This matters even more if you work with freelancers, editors, designers, or virtual assistants.
A character guide prevents visual drift.
Without one, small changes creep in over time. The hair changes. The age changes. The style changes. Suddenly your calm AI workflow coach looks like a different person who just borrowed the same laptop.
Document the rules early so every future image has a standard to follow.
Common Mistakes to Avoid
Creating a consistent AI character takes some experimentation. The good news is that most problems come from a few common mistakes.
Mistake 1: Changing the Prompt Too Much
If you change the age, hairstyle, clothing, ethnicity, style, and lighting every time, you will not get a consistent character.
Keep the core identity stable.
Change the scene. Change the pose. Change the use case. But keep the character description, wardrobe direction, and visual style mostly the same.
Mistake 2: Using Too Many Tools at Once
Different AI tools interpret prompts differently.
If you jump between platforms without a reference workflow, your character may change dramatically. One tool may make the face softer. Another may change the age. Another may turn your business coach into a perfume ad.
Start with one main tool or workflow. Once you have a stable character, then you can experiment carefully.
Mistake 3: Ignoring Negative Prompts
Negative prompts help reduce unwanted artifacts.
Use them to avoid:
- Distorted hands
- Extra fingers
- Strange eyes
- Heavy filters
- Logos
- Text
- Overly glossy skin
- Inconsistent age
- Exaggerated poses
Negative prompts are not perfect, but they help. Think of them as guardrails, not magic spells.
Mistake 4: Expecting Perfect Consistency Immediately
AI character consistency takes iteration.
You may need to test prompts, reference images, seeds, models, and tools before you find a stable workflow.
That is normal.
The machine is drawing with a foggy memory. Your job is to give it a sharper one.
Save your best results, compare them side by side, and keep refining your prompt library.
Final Thoughts
A consistent AI character can become a powerful brand asset.
It can help solopreneurs, creators, and small businesses create recognizable visuals, build recurring campaigns, and produce content faster without scheduling photoshoots or hiring a large creative team.
The key is structure.
Define the character. Create a strong reference image. Build a prompt library. Keep the wardrobe and visual style consistent. Document the rules. Then use the character repeatedly across your content.
One AI image is decoration.
A consistent AI character is an asset.
Read more: Best AI Image Generators in 2026
1 thought on “How to Create a Consistent AI Character for Your Brand”